 Beaker
Turn your Apple Wallet cards into photos you love將 Apple Wallet 裡的卡片換成自己喜歡的照片
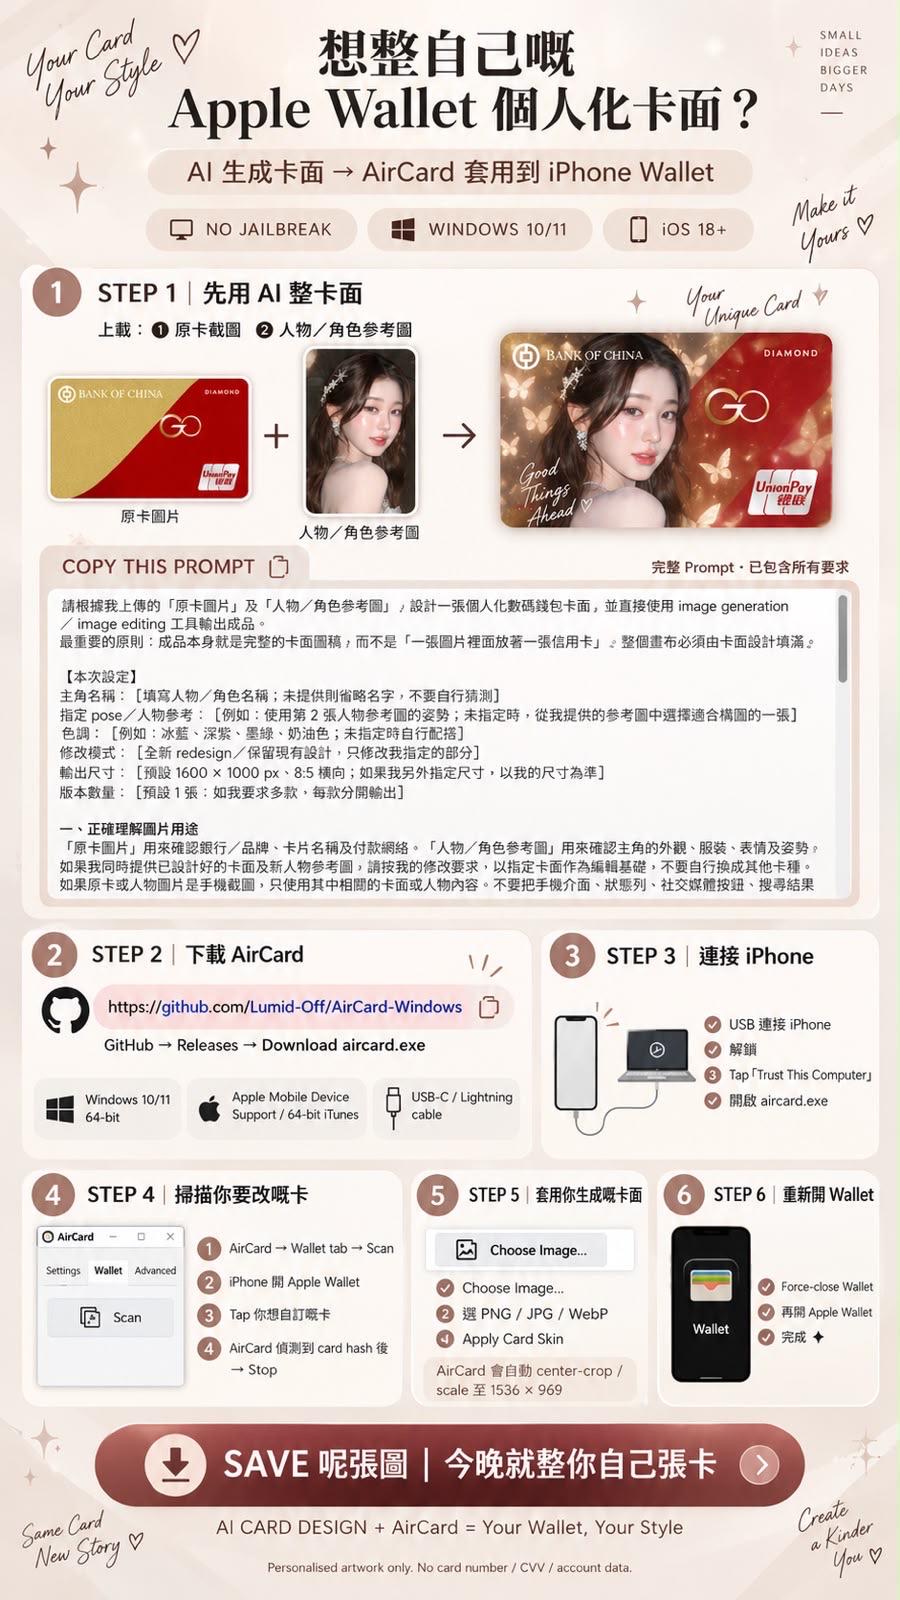
Hey, it's Beaker 🌷 You commented “Card”, so here's the full guide. First you let AI design your own card art from a photo you love, then you use a free tool called AirCard to put it on the card in your iPhone's Apple Wallet. No jailbreak needed. 💳✨
你好,我是 Beaker 🌷 你留言了「Card」,完整教學就在這裡!先用 AI 把你喜歡的照片製作成專屬卡面,再用免費工具 AirCard 套用到 iPhone 的 Apple Wallet,無需越獄(jailbreak)。💳✨
The prompt below works as is. Just fill in the settings at the top to make the card look exactly how you want.
下方的提示詞可以直接複製使用,只要修改最上方的設定,就能做出你想要的樣子。
What you need你需要準備
- 💻A 64-bit Windows 10 or 11 computerWindows 10/11(64-bit)電腦
- 📱An iPhone on iOS 18 or later, no jailbreakiOS 18 或以上的 iPhone,無需越獄
- 🍎Apple Mobile Device Support (comes with 64-bit iTunes)Apple Mobile Device Support(安裝 64-bit iTunes 就有)
- 🔌A USB-C or Lightning cableUSB-C/Lightning 線
01Design the card with AI先用 AI 製作卡面
Open an AI tool that can generate or edit images (for example ChatGPT). Upload two images:
打開一個能生成或修改圖片的 AI 工具(例如 ChatGPT),上載兩張圖片:
- A screenshot of your original card, so the AI knows the bank, card name and payment network.原卡截圖:讓 AI 知道銀行、卡片名稱及付款網絡。
- A reference photo of the person or character you want on the card.人物/角色參考圖:你想放在卡面上的人物。
Then paste this prompt and send it.
然後貼上以下提示詞並送出。
請根據我上傳的「原卡圖片」及「人物/角色參考圖」,設計一張個人化數碼錢包卡面,並直接使用 image generation/image editing 工具輸出成品。

最重要的原則:
成品本身就是完整的卡面圖稿,而不是「一張圖片裡面放著一張信用卡」。整個畫布必須由卡面設計填滿。

【本次設定】

主角名稱:
[填寫人物/角色名稱;未提供則省略名字,不要自行猜測]

指定 pose/人物參考:
[例如:使用第 2 張人物參考圖的姿勢;未指定時,從我提供的參考圖中選擇適合構圖的一張]

色調:
[例如:冰藍、深紫、墨綠、奶油色;未指定時自行配搭]

修改模式:
[全新 redesign/保留現有設計,只修改我指定的部分]

輸出尺寸:
[預設 1600 × 1000 px、8:5 橫向;如果我另外指定尺寸,以我的尺寸為準]

版本數量:
[預設 1 張;如我要求多款,每款分開輸出]

一、正確理解圖片用途

「原卡圖片」用來確認銀行/品牌、卡片名稱及付款網絡。

「人物/角色參考圖」用來確認主角的外觀、服裝、表情及姿勢。

如果我同時提供已設計好的卡面及新人物參考圖,請按我的修改要求,以指定卡面作為編輯基礎,不要自行換成其他卡種。

如果原卡或人物圖片是手機截圖,只使用其中相關的卡面或人物內容。不要把手機介面、狀態列、社交媒體按鈕、搜尋結果文字、交易紀錄或其他截圖內容帶入成品。

以我最新的明確要求及本次指定圖片為準,不要沿用之前其他卡片的品牌、卡名或文字。

二、品牌與卡種必須正確

保留本次原卡正確的銀行/品牌名稱、必要標誌、卡片產品名稱及付款網絡。

品牌、產品名稱及付款網絡是不同元素,不能互相混淆,也不能混入其他卡片的標誌。

卡片等級或產品字樣只有在原卡存在,或我明確要求時才加入。不要自行加上不屬於該卡的等級名稱。

品牌標誌需要清晰、比例正常,但不要大到搶走主角的視覺焦點。可以重新安排位置及大小,令整體更精緻。

這是個人化藝術卡面,不要自行添加「官方聯乘」「官方代言」等宣稱。

三、人物/角色外觀以參考圖為準

如果主角是真人:
以我提供的真人參考圖作為外觀依據,優先保留原本的臉型、眼睛、鼻子、嘴唇、五官比例、髮型及表情特徵。

不要把人物重新美化成另一張泛用 AI 模特兒臉。不要擅自改變年齡感、身形比例、服裝或重要配件。

可以改善清晰度及調整光線,令人物融入卡面,但不要因為配合設計而大幅改變樣貌。

如果主角是動漫或插畫角色:
保留該角色原本的畫風、輪廓、比例、髮型、服裝及代表性特徵。不要擅自真人化、3D 化,或改成不相關的畫風,除非我有要求。

人物名稱以我提供的文字為準,不要自行猜名或改名。

四、pose 必須跟隨指定參考

如果我指定某張參考圖,請保留該圖的身體朝向、頭部角度、視線、手部動作、表情及服裝。

不要只保留人物名字,卻自行換成另一個姿勢。

如果我要求「換另一個 pose」,請從我提供的其他參考圖中選擇明顯不同、尚未使用的姿勢,不要再次使用相同的托腮、手指碰臉或同角度大頭照。

如果我要求「沿用這個 pose」,就不要再改動姿勢。

多張參考圖不代表需要把所有人物照片拼在同一張卡上。預設只使用一個清楚的主視覺人物。

如我要求多個版本,每款使用不同的指定 pose,並分開輸出完整卡面。

五、卡面必須滿版,沒有任何外框

整張圖片必須是正面、平面的橫向卡面圖稿。

背景與設計須延伸至畫布四邊及四個角落:
沒有白邊、黑邊、透明邊、外圍留白或額外 padding。

不要畫出一張較小的卡,再把它放在另一個背景上。

不要製作:
實體卡 mockup、桌面場景、懸浮卡片、卡片厚度、透視角度、外部投影、倒影、展示框或手機模型。

不要預先切出圓角,也不要在四角留下白色、黑色或透明區域。輸出完整矩形,四角同樣由設計填滿。

卡面內部可以有漸層、光影及材質層次;但卡面外面不能再有另一層背景。

六、比例與安全位置

按指定尺寸構圖。未指定時,以 1600 × 1000 px、8:5 橫向作為目標,不要改成方形、直向海報或 16:9。

不要把整張手機截圖的比例當作卡面的比例。

人物、名字、銀行標誌及付款標誌需要合理排版,不要 oversize。

所有重要文字及標誌盡量距離畫布邊緣約 7%–10%,避免放入卡面顯示區時被裁切。

主角可以自然延伸至畫面邊緣,但不要不必要地切掉眼睛、嘴巴、頭部或指定手勢,也不要為了塞進構圖而拉長、壓扁人物。

文字周圍的呼吸空間必須是「卡面內的背景空間」,不是圖片外圍的白邊。

七、背景需要配合主角重新設計

當我要求全新 redesign:
不要只把人物貼在原卡上。請重新設計背景、色調、構圖、材質、光影及文字層級。

原卡上的城市、地標、香港景色、飛機、圖案等裝飾,不是必須保留的元素。除非我要求,否則可以完全重新設計。

背景應配合主角:
真人可以採用時尚 editorial、電影感、簡約高級、舞台光影或柔和生活感。
動漫角色可以採用符合原角色氣質的插畫、可愛、復古、漫畫或趣味圖案。

不要每張卡都套用同一套鑽石、星光、光圈、雲朵或城市背景。

可以使用適量裝飾建立層次,但不要堆滿元素。人物及主要文字必須清楚,整體要有呼吸感。

人物需要自然融入背景,避免硬切邊、殘留原背景色、粗糙去背或明顯貼圖感。

八、文字可以重新創作

主角名字可以使用適合風格的手寫字、設計字或精緻排版,不必固定使用同一種字體。

可以重新創作與主角及卡面氣質相符的短句,不要每張都重複同一套 beauty/brighter tomorrow 文案。

文案應簡短、自然、有意思,英文必須語法正確。

預設以「主角名字+一句主要短句」為核心;有需要才增加一句輔助文字,不要把卡面塞滿零碎標語。

真人、可愛角色、旅行主題等,應使用不同語氣,不要一律套用美容廣告文案。

名字、標語與標誌不能互相重疊,也不能遮住主角的臉。

不要把未填寫的設定欄位、方括號或製作說明印在圖片上。

九、不要任何卡號或付款資料

完全移除卡號,包括最後四位數字及遮蔽符號。

不要加入:
卡號、部分卡號、圓點遮蔽符號、星號遮蔽符號、有效日期、CVV、帳戶資料、虛構付款資料或佔位數字。

不要因為原卡截圖有卡號,就把它複製進新設計。

保留正確的銀行及付款網絡標誌即可;其他識別元素只在原卡存在且有必要時保留。

十、修改時不要改動已確認的內容

如果我只要求更改名字、品牌字樣、色調、pose 或刪除卡號,請只修改指定部分。

不要在修正文字時改變人物樣貌。
不要在更換 pose 時換錯銀行。
不要在刪除卡號時重新加入外框。
不要在修改一個元素時,把已確認的整張設計推倒重做。

只有當我明確要求「全新 redesign」,才全面重新設計。

十一、輸出前檢查

請先自行檢查:
品牌、產品名稱及付款網絡是否正確;
人物/角色是否忠實於指定參考;
pose 是否符合要求;
有沒有混入之前其他卡片的文字;
有沒有殘留任何卡號或遮蔽符號;
是否完整滿版、沒有外框及四角留白;
比例、文字及標誌是否適合卡面顯示;
人物與背景是否自然融合。

完成後,直接使用 image generation/image editing 工具輸出成品。

不要使用 Python 或程式繪圖拼貼來代替圖像生成。
不要只回覆設計建議、製作教學或另一段 prompt。
不要輸出手機截圖、展示 mockup 或多款拼在一起的預覽板。

除非我另外要求,最後只輸出一張完成的滿版卡面圖片,不需要附加解說。
Using the "original card image" and the "person / character reference image" I've uploaded, design a personalised digital wallet card face, and output the finished result directly with an image generation / image editing tool.

The most important rule:
The result itself must be the complete card artwork, not "a picture with a credit card inside it". The whole canvas must be filled by the card design.

[Settings for this card]

Main character name:
[Fill in the person / character name. If none is given, leave the name out. Don't guess.]

Pose / reference:
[e.g. use the pose from reference image 2. If not specified, choose the reference image that suits the composition best.]

Colour palette:
[e.g. ice blue, deep purple, forest green, cream. If not specified, choose one yourself.]

Edit mode:
[Full redesign / keep the current design and only change the parts I specify]

Output size:
[Default 1600 × 1000 px, 8:5 landscape. If I give another size, use mine.]

Number of versions:
[Default 1. If I ask for several, output each one separately.]

1. Understand what each image is for

The "original card image" confirms the bank / brand, card name and payment network.

The "person / character reference image" confirms the main character's look, outfit, expression and pose.

If I provide both a finished card design and a new character reference, follow my edit request and use the specified card as the base. Don't switch to a different card type.

If the card or character image is a phone screenshot, only use the relevant card or character content in it. Don't carry the phone interface, status bar, social media buttons, search result text, transaction history or anything else from the screenshot into the result.

Follow my latest explicit request and the images for this card. Don't reuse the brand, card name or text from any earlier card.

2. The brand and card type must be correct

Keep this card's correct bank / brand name, required logos, card product name and payment network.

The brand, product name and payment network are different elements. Don't mix them up, and don't bring in logos from other cards.

Only add a card tier or product wording if it's on the original card or I ask for it. Don't add a tier name that doesn't belong to this card.

Logos must be clear and in normal proportion, but not so big that they pull focus from the main character. You may reposition and resize them to make the whole design more refined.

This is personalised art for the card face. Don't add claims such as "official collaboration" or "official endorsement".

3. The character's appearance follows the reference image

If the main character is a real person:
Use the reference photo I provided as the basis for their appearance. Keep their original face shape, eyes, nose, lips, facial proportions, hairstyle and expression as the priority.

Don't beautify them into a generic AI model face. Don't change their apparent age, body proportions, outfit or important accessories.

You may improve clarity and adjust lighting so they blend into the card, but don't noticeably change how they look to fit the design.

If the main character is an anime or illustrated character:
Keep the character's original art style, outline, proportions, hairstyle, outfit and signature features. Don't make them realistic, 3D, or switch to an unrelated style unless I ask.

Use the name exactly as I give it. Don't guess or change the name.

4. The pose must follow the specified reference

If I specify a reference image, keep that image's body direction, head angle, gaze, hand gestures, expression and outfit.

Don't keep only the character's name and switch to a different pose.

If I ask for "a different pose", choose a clearly different pose I haven't used yet from my other reference images. Don't repeat the same chin-on-hand, finger-on-face or same-angle headshot.

If I ask to "keep this pose", don't change the pose again.

Several reference images doesn't mean putting every photo on one card. By default, use one clear main character.

If I ask for several versions, give each one a different specified pose and output each complete card separately.

5. The card must be full-bleed, with no frame

The whole image must be a front-facing, flat, landscape card design.

The background and design must extend to all four edges and all four corners of the canvas:
no white, black or transparent borders, outer margins or extra padding.

Don't draw a smaller card and place it on another background.

Don't create:
a physical card mockup, desk scene, floating card, card thickness, perspective angle, drop shadow, reflection, display frame or phone mockup.

Don't pre-cut rounded corners, and don't leave white, black or transparent areas in the corners. Output a complete rectangle with all four corners filled by the design.

Gradients, lighting and texture are fine inside the card, but there must be no second background layer outside it.

6. Proportions and safe areas

Compose for the specified size. If none is given, aim for 1600 × 1000 px, 8:5 landscape. Don't change it to a square, portrait poster or 16:9.

Don't use the proportions of a whole phone screenshot as the card's proportions.

Lay out the character, name, bank logo and payment logo sensibly. Don't oversize them.

Keep all important text and logos about 7–10% away from the canvas edges, so nothing is cropped when the card is displayed.

The main character may extend naturally to the edge, but don't needlessly crop their eyes, mouth, head or the specified gesture, and don't stretch or squash them to fit the composition.

The breathing room around text must be background space inside the card, not a white border around the image.

7. Redesign the background to suit the character

When I ask for a full redesign:
Don't just paste the character onto the original card. Redesign the background, colours, composition, textures, lighting and text hierarchy.

Decorations on the original card, such as cities, landmarks, Hong Kong scenery, planes or patterns, don't need to be kept. Unless I ask, you may redesign them completely.

The background should suit the character:
For a real person, try fashion editorial, cinematic, minimal luxury, stage lighting or a soft lifestyle feel.
For an anime character, use illustrated, cute, retro, comic or playful patterns that fit the character.

Don't reuse the same diamonds, sparkles, light halos, clouds or city background on every card.

Use a moderate amount of decoration for depth, but don't overcrowd it. The character and main text must be clear, and the design needs breathing room.

The character should blend naturally into the background, with no hard cut-out edges, leftover background colour, rough masking or obvious pasted-on look.

8. Text can be newly written

The character's name can use handwriting, display type or refined typography that suits the style. It doesn't have to be the same font every time.

You may write a new short line that fits the character and the card's mood. Don't repeat the same beauty / brighter tomorrow copy on every card.

Copy should be short, natural and interesting, and any English must be grammatically correct.

By default, build around "the character's name + one main line". Add one supporting line only if needed. Don't fill the card with scattered slogans.

Use a different tone for a real person, a cute character, a travel theme and so on. Don't default to beauty-advert copy.

The name, tagline and logos must not overlap each other or cover the character's face.

Don't print unfilled settings, square brackets or production notes on the image.

9. No card numbers or payment details

Remove the card number completely, including the last four digits and any masking symbols.

Don't add:
card numbers, partial card numbers, dot or asterisk masking, expiry dates, CVV, account details, made-up payment details or placeholder digits.

Don't copy the card number into the new design just because the original screenshot shows it.

Keeping the correct bank and payment network logos is enough. Keep other identifying elements only if they're on the original card and necessary.

10. When editing, don't change what's already approved

If I only ask to change the name, brand wording, colours, pose or remove the card number, change only that part.

Don't change the character's appearance while fixing text.
Don't switch to the wrong bank while changing the pose.
Don't add a frame back while removing the card number.
Don't redo the whole approved design while changing one element.

Only redesign everything when I explicitly ask for a "full redesign".

11. Check before output

Check first:
Are the brand, product name and payment network correct?
Is the character faithful to the specified reference?
Does the pose match the request?
Has any text from earlier cards slipped in?
Is any card number or masking symbol left?
Is it fully full-bleed, with no frame and no blank corners?
Are the proportions, text and logos right for a card display?
Does the character blend naturally with the background?

When done, output the finished result directly with an image generation / image editing tool.

Don't use Python or code-drawn collages instead of image generation.
Don't reply with only design suggestions, a tutorial or another prompt.
Don't output a phone screenshot, a display mockup or a preview board with several designs.

Unless I ask otherwise, output only one finished full-bleed card image, with no explanation.
💡 Change only the lines in [Settings for this card]: the name, pose, colours, edit mode, size and number of versions. Everything else can stay as it is.💡 只需修改【本次設定】中的內容:主角名稱、姿勢、色調、修改模式、尺寸及版本數量,其餘部分無需更改。
Save the finished card image as PNG, JPG or WebP.
將完成的卡面儲存為 PNG、JPG 或 WebP 格式。
step 2第 2 步02Download AirCard下載 AirCard
AirCard is a free Windows tool on GitHub. Go to the page below, open Releases, and download aircard.exe.
AirCard 是 GitHub 上的免費 Windows 工具。打開以下連結,進入 Releases,下載 aircard.exe。
Only download it from this official GitHub page.
請只在這個官方 GitHub 頁面下載。
step 3第 3 步03Connect your iPhone連接 iPhone
- Plug your iPhone into the computer with the cable.用 USB 線將 iPhone 連接到電腦。
- Unlock your iPhone.解鎖 iPhone。
- Tap Trust This Computer when it asks.出現提示時點選「信任此電腦」(Trust This Computer)。
- Open
aircard.exe.開啟aircard.exe。
04Scan the card you want to change掃描要更改的卡片
- In AirCard, go to the Wallet tab and click Scan.在 AirCard 進入 Wallet 分頁,點選 Scan。
- On your iPhone, open Apple Wallet.在 iPhone 上打開 Apple Wallet。
- Tap the card you want to customise.點選你想更改的卡片。
- When AirCard detects the card hash, click Stop.AirCard 偵測到 card hash 後,點選 Stop。
05Apply your new card art套用你生成的卡面
- Click Choose Image…點選 Choose Image…
- Pick the PNG, JPG or WebP card you made in step 1.選擇你在第 1 步製作好的 PNG/JPG/WebP 卡面。
- Click Apply Card Skin.點選 Apply Card Skin。
AirCard centre-crops and scales the image to 1536 × 969 for you.
AirCard 會自動置中裁切,並縮放至 1536 × 969。
step 6第 6 步06Reopen Wallet重新開啟 Wallet
- Force-close Apple Wallet (swipe it away in the app switcher).強制關閉 Apple Wallet(在多工畫面中將它向上滑走)。
- Open Apple Wallet again. Your new card art is there ✨再次打開 Apple Wallet,新卡面就會出現 ✨
Good to know: this only changes how the card looks on your own iPhone. The card art is personalised artwork only, so never put a card number, CVV or account details in it. AirCard is a third-party tool, not made by Apple.
小提醒:此方法只會改變卡片在你自己 iPhone 上的外觀。卡面僅為個人化設計,請勿放入卡號、CVV 或任何帳戶資料。AirCard 是第三方工具,並非 Apple 官方出品。
Same card, new story ♡同一張卡,新的故事 ♡
Watch the full video, and follow for more soft, practical AI tips.
觀看完整影片,並追蹤我學習更多實用 AI 小貼士。